Well, since I wrote my last blog post, encouraging us all to think about family portraits this summer, we have entered the COVID-19 isolation and social distancing intended to “flatten the curve” and slow the spread of this terrible virus. That sure makes thinking about weddings, events, and portrait sessions seem even harder than before! And surely, staying home and away from people is the right thing to do to slow the spread.
So instead, we are retreating to our computers even more than before, transitioning to an even more fully-virtual life and workplace where we are dependent on virtual meetings, avatars, and social media profiles. And if you’re like me, you’re noticing that many folks’ profile photos and headshots sure could use a refresh!
But alas, studio portrait sessions are not an option for the next few weeks, so this is a task you must undertake on your own, in the comfort of your own home, with your smartphone in the hands of a competent loved one. To help, here are some simple tips you can employ, using the most basic lighting and camera equipment: a window and a smartphone. Ideally, this is not a selfie, it is a photo taken by another human being who can be farther away from you than an arm’s length. But if that is not possible, then just do your best!
1. Face the window. The natural light, best if it’s diffused through the clouds or through curtains, is going to be the most flattering, especially compared with incandescent or fluorescent lighting. Put yourself in front of the window, so that it’s lighting your whole face, and have the person taking your photo stand in front of you (remember, ideally this is NOT a selfie), with their back to the window, not blocking too much of the light.
2. Try to find a blank wall as your background. For our purposes, since we’re working with smartphones, the least-busy background you can find is going to be your best bet. Find a blank wall in your home, and bonus points if that wall is white or gray!
3. If you don’t have a blank wall in your home, don’t sweat it. Just find a place where the background is not too cluttered or messy and relatively open.
4. Stand at least 3 feet from your background. Especially if it’s a wall, don’t stand right up against it (a rookie mistake!). Give yourself some distance between you and the background to allow for some depth in your photo.
5. Have the camera positioned at least 3 feet from you. This is NOT a selfie. Ideally, you have someone else holding the camera, but if not, then prop it up somewhere. Remember that you’ll crop your headshot later to make it a tight head-and-shoulders photo. Giving yourself this distance between you and the camera will help make you look more proportional in the final photo, avoiding the giant “selfie-forehead.”
6. Pose. No, you don’t have to be Kim Kardashian, but you do have to do a little something. Facing the camera straight-on with shoulders straight and chin up is the most common – and LEAST flattering – pose I see in homemade headshots. Instead, turn your body slightly on an angle and then turn your face to look at the camera. Chin down. A little farther down than parallel to the floor. A nice friendly smile with or without teeth (your preference.)
7. Load it into your computer and crop to a head-and-shoulders photo. Voila! No, it’s not perfect, but remember that it’s a placeholder for now. Once social distancing is over and we’re back to near-normalcy, I can make you a real-life headshot in my studio! So try not to stress!
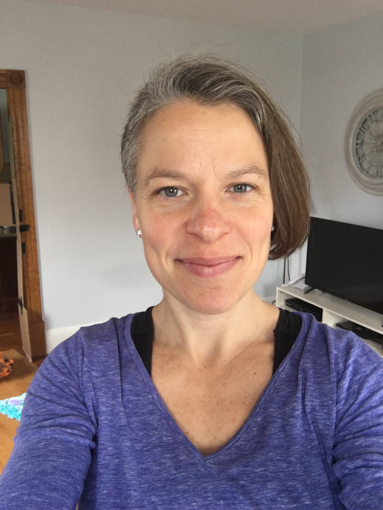
Now, to help demonstrate, I have put all of my own insecurities aside (including a messy house) to show you some examples. First a selfie. See the big forehead? Selfies are not the first choice for headshots, but of course you do what you must.
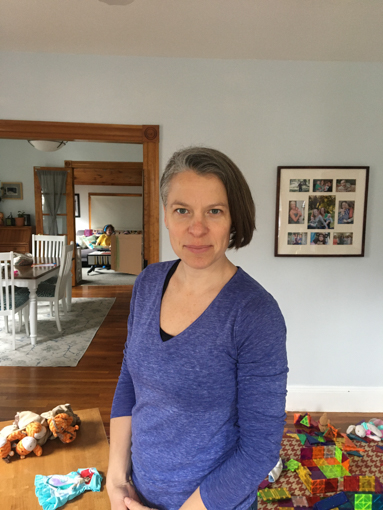
Second, the uncropped photo. See how wide we took it? My wife was positioned three feet in front of me, I am far from the background, and have the window in front of me. See how I am turned slightly and chin is down a little?
Third, the cropped headshot. A much tighter shot, but if you try to shoot it this tight with a smartphone, you’re back to the big-forehead problem. So shoot it wide and crop.

Feel free to reach out to share your own at-home headshot adventures or if you need help, send me an email with your photo and I can share some personalized tips to help you out. Good luck!